If you want to create your own website or webblog, you are often faced with a ton of possible frameworks. Here in this post, I’ll explain how you can easily setup your webblog with the static page generator hugo.
To get started, you first need to install the Hugo framework. I used on Ubuntu the Snap store for it.
In the next step I created a new directory, where I created all the necessary files. In order to create a new hugo blog, you can cd into the desired directory and then call
$ hugo new site <your sitename>
In the picture you can see, that the creation with the hugo new call creates directely a certain number of folders and files for you.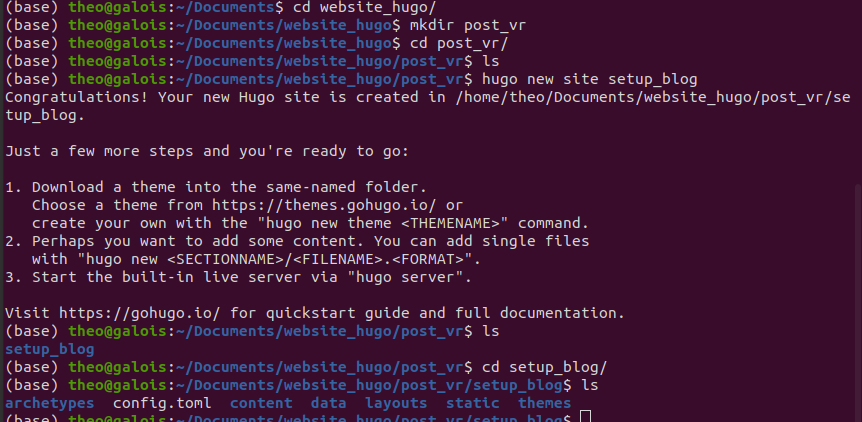
If you want to add some content to your blog, you can call
$ hugo new posts/<title of your post>.md
This will create a markdown file with your chosen title. You will see a header, that is structured like
+++
title= "Setting up a Webblog with Hugo"
date= 2021-12-21T11:31:19+01:00
draft= false
author = "Your Name"
tags = []
+++
Note that by default draft is set to true. This will prevent, that you cannot show it in your final blog.
You can update the default settings for this header in the config.toml file. For further information how this can be done, I’ll refer to the official Hugo documentary.
It is useful to add tags, because later on you can show all posts, that share a tag together at once.
So, you are now able to create new content to your blog, but if you call
$ hugo server
and launch your localhost, you’ll realize, that you have no styling at all and that it looks really boring. Now you have two options (or certainly there are more and I just don’t know about them). You can either choose a theme on the official hugo website and unpack this in the themes folder of your hugo project. You will find a lot of sample themes and I’m sure you will find one that you like. In this case you do not need to touch any css or javascript at all.
Nevertheless I decided to design and play with bootstrap, css, javascript and html on my own.
In this blog with hugo I want to create content in the form of markdown files, which will then be in a nice looking websetup. In order to have for example the same header with navbar for all blog posts, we need to define a base website and then use some hugo code. The code shown below is an example of how this could be achieved. There is some base html with bootstrap. In order to convert the content in markdown into renderable html we make use of the hugo scipting language
Here we fetch the title of the site and put it in the header of the website. Note that the name of the website is strict. This side, that builds the skeleton for the content, must be named baseof.html.
The hierarchy of the sites is strict! The rules of how to name the sites can be found here.
In order to put the content from each site into the website, we see in the picture above {{ block "main" .}}{{end}} ; we need to define the "main" in a file called single.html.
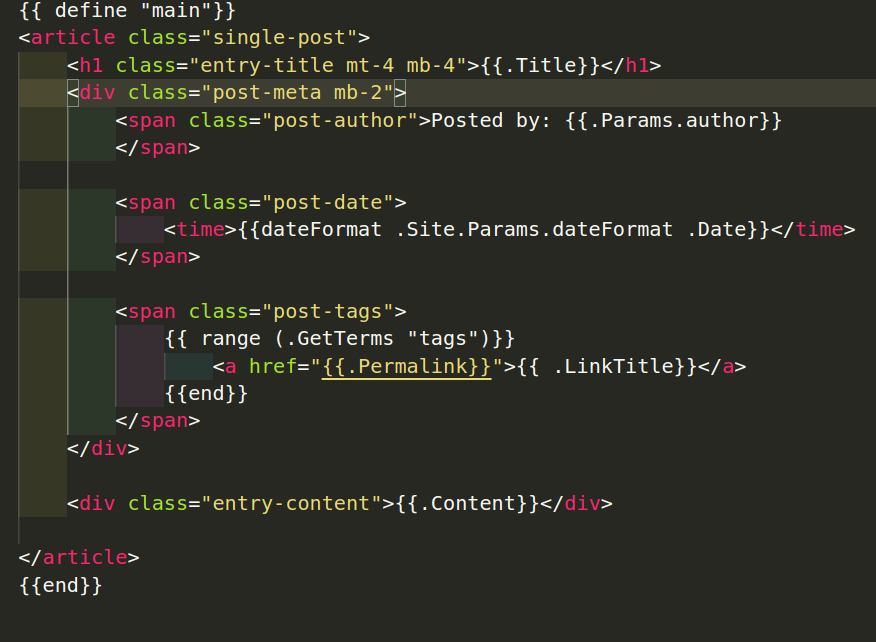
Note that the syntax starts with {{define "main"}} and ends with {{end}}. The part inbetween has the html article structure and uses the hugo script calls to fetch the title, the date, the tags and the content of the corresponding markdown file.
This allows you to define a single page with navbar and content. But of course we want to have an overview page for all the blog posts as well. To achieve this, we modify the list.html. Note that with the hierarchy, the list.html will be embedded into the skeleton defined above. I call a hugo method with the {{ range .Paginator.Pages}}, this allows to loop over all posts and to display them in the listing page.
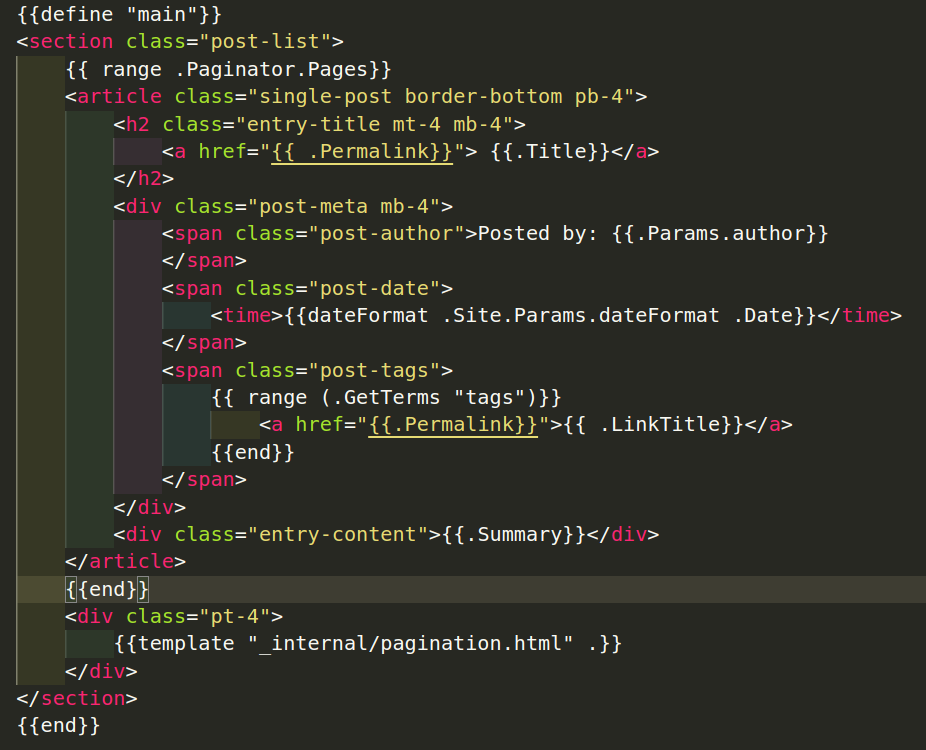
We can fetch the information about the author, the date and the summary in order and display them, seen as above.
Lastly, we want to have a good looking landing page. All the .html files before need to be saven in the folder layouts/_default, the landing page only needs to be saven in the folder layouts and needs to be called index.html. So, have fun to choose your favorite layout, your fancy animations with javascript to design. I decided to keep it simple and to just choose a background image for the div, that is the main container, but that could be your wonderland for your front end skills.
There are a few thinks that should be noted on the links for the pictures and the css stylesheets. However there was some issue with the deployment on the server on github pages. I do not really know why this is happening, but in the localhost all the links for the images and css sheets seem to work. Nevertheless when performing the page build with the call hugo, the links all do not work anymore. For images, this is relatively easy to fix. You just need to add the line relativeURLs = true in your config.toml file. This will create the right relative paths in the generated html pages from the markdown content. But this does not work for the css stylesheets. The problem is, that the html file baseof.html is the base for each post and each the list page of all written posts. The hugo generator does not change the html files in the layout, but merges them smartly. When we precise the location of the css stylesheet, we have in the header of baseof.html the following line <link rel="stylesheet" href="../css/home.css">, or whatever name you gave to your css sheet. The issue is now, that we have the paths public/posts/index.html for the overview page of all posts and for a single post public/posts/blog-setup/index.html, so the css link for the generated blog-setup page does not work, as we have to go up two directories to get to the css stylesheet. There are two ways to fix this.
I made use of both. For the first I changed the the files layout/_default/list.html and layout/_default/single.html. For the single.html, there was before a structure as follows
{{ define "main"}}

  <article class="single-post">
    [..]
  </article>

{{end}}
This would fetch the baseof.html and put the generated html in there. Instead I neglegted the baseof.html a bit and changed single.html to the following
<!DOCTYPE html>
<html lang="en">
<head>
    [...]
    <title>{{.Title}}</title>
    <link rel="stylesheet" href="../../css/bootstrap.min.css">
    <link rel="stylesheet" href="../../css/home.css">
    [...]
</head>
<body>
<header id = "site-header">...
</header>
<main class="site-main">
    <div class="container">
        <article class="single-post">
        [...]
        </article>
    </div>
</main>
Similarly I changed the list.html to
<!DOCTYPE html>
<html lang="en">
<head>
    [...]
    <title>{{.Title}}</title>
    <link rel="stylesheet" href="../css/bootstrap.min.css">
    <link rel="stylesheet" href="../css/home.css">
    [...]
</head>
<body>
<header id = "site-header">...
</header>
<main class="site-main">
    <div class="container">
        <article class="post-list">
        [...]
        </article>
    </div>
</main>
Now both have the correct links to the css stylesheets and can be displayed nicely.
A similar problem appeared for the overview pages for the different tags. There hugo also takes the list.html and iterates over all posts, that have for example the tag “virtual reality”. But for each tag, the path to the overview page is public/tags/<Your favorite tag>/index.html, but the css directory can be found under public/css/home.css, hence one would need to go two directories up to read the css information. Compare this to the list.html. In order to overcome this, I just copied the css directory into public/tags/css/. Then the paths to the css directory work again.
Deployment on Github
First of all direct to the directory where your config.toml file is saved.
The first thing you should do is to change the baseURL to baseURL = 'https://<YOUR USERNAME>.github.io/'. If you choose the path like this you will get good results in the localhost, but big big big frustration, when you try to host the project on github pages. You need to add the repository name to your path. Otherwise all your paths are messed up. If the github repository for your blog is called blog, the baseURL needs to be baseURL = 'https://<YOUR USERNAME>.github.io/blog'
First of all direct to the directory where your config.toml file is saved.
In this directory, what could be called blog you should call git init. You now have locally on your machine some posts, and you need to add them to your git. Therefore you need to call to check in all the files in your git repository.
<Directory-of-your-blog>$ git add .
<Directory-of-your-blog>$ git commit -m "<Your favorite commit message>
Once this is done, you need to create on github a repository. In order to do this, go to github
and click on new repository. Then give the repository your favorite name and add some description if you want.
Now you should see a the github repository setup site. As you already created a repository, the second block entitled with …or push an existing repository from the command line is the one you are looking for.
<Directory-of-your-blog>$git remote add origin https://github.com/<Your Account>/<Your Reponame>.git
<Directory-of-your-blog>$git branch -M main
<Directory-of-your-blog>$git push -u origin main
Make sure that you use the github access token and not your old access password.
Next we need to create a new folder inside our blog project. So cd into the folder of the blog project. Note that the folders strictly need to have these following names:
mkdir .github
cd .github
mkdir workflows
Inside of the directory workflows create a file called gh-pages.yml. This file will be important, because it will allow to run the hugo methods in the github pages, i.e the pagination, the tagging will work online with the help of this file. You will need to paste the following in the gh-pages.yml file
on:
  push:
    branches:
      - main  # Set a branch to deploy
  pull_request:

jobs:
  deploy:
    runs-on: ubuntu-20.04
    steps:
      - uses: actions/checkout@v2
        with:
          submodules: true  # Fetch Hugo themes (true OR recursive)
          fetch-depth: 0    # Fetch all history for .GitInfo and .Lastmod

      - name: Setup Hugo
        uses: peaceiris/actions-hugo@v2
        with:
          hugo-version: 'latest'
          # extended: true

      - name: Build
        run: hugo --minify

      - name: Deploy
        uses: peaceiris/actions-gh-pages@v3
        if: github.ref == 'refs/heads/main'
        with:
          github_token: ${{ secrets.GITHUB_TOKEN }}
          publish_dir: ./public
This can be found as well in the hugo documentation. Next of course push this folders with this file to github. You need to make sure, that your access token allows you to change the workflow.
Now all your content should be visible on github. Go to Actions
If you named the folder workflows correctly, you should see a page as follows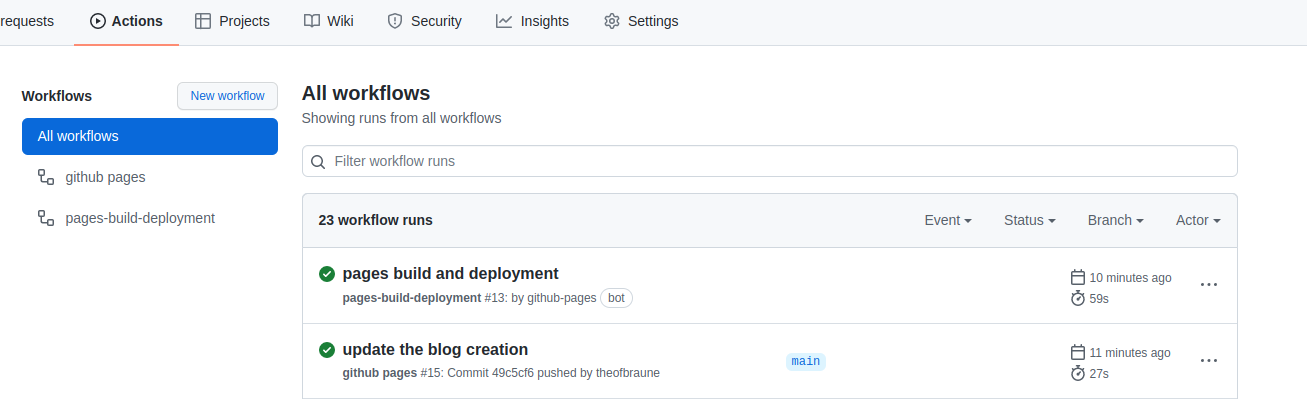
gh-pages. There all the static html sites are located, now you should be able to see your blog under the url
'https://<YOUR USERNAME>.github.io/<YOUR REPONAME>'